
In this tutorial we'll draw a very realistic cup of coffee. Underneath the cup we'll add some stain using custom brush. This tutorial may look advance but the techniques are simple.
Preview of Final Results

Step 1 - Drawing Coffee
Start by creating circle shape using ellipse tool. Set foreground color to #F2F2F2. Make sure you have selected shape icon from the option bar, then shift+drag to create a circle. From the Layers panel, double click circle shape layer and add layer style Inner Shadow, Outer Glow, and Bevel and Emboss.


Step 2
Create smaller circle inside the previous circle. Double click its thumbnail layer and in Layer Style dialog box make sure you activate Layer Mask Effects. Also, add layer style Inner Shadow and Outer Glow to the circle.


Step 3
In Layers panel, click Add Layer Mask icon, black square with circle inside it. Paint left bottom of the circle to hide some of the shadow.

Step 4
Our previous steps has add shadow to the cup but still not enough. So, we'll need to create darker shadow. (a) Start by creating a circle selection covering our previous circle and fill it with black. (b) While marquee tool still selected, hit left arrow three times and down arrow three times to nudge the selection 3 pixels down and 3 pixels left. (c) Hit Delete and remove selection (ctrl+D). (d) Click Filter > Blur > Gaussian Blur to soften the shadow (e). (f) Bring down the opacity to 5%.

Step 5
We're done with the shadow and now move on to the highlight. Highlight should be in opposite side of the highlight. Repeat same techniques in previous step, but this time fill with white and use up and right arrow key.

Step 6
We're done with the cup. Create a circle shape with color #1F120D. Add layer style Outer Glow with gradient white suddenly stop to black.

Step 7
Again, create smaller circle with same color. Double click layer and activate Layer Mask Hides Effects then add Gradient Overlay with black to white gradient at 52 degree. Paint bottom left of the circle to create highlight on the water.

Step 8
We'll also need to create some bubble floating above the water. To do this, select the coffee and subtract it using lasso tool. See image below for reference.

Step 9
Create new layer. Click Edit > Fill. Choose Use: Color and pick #765E36.

Step 10
Now select eraser tool and choose hard edge brush, harness: 95%. Use [ and ] to increase and decrease brush size. Paint on the brown color to draw holes for the bubble.

Step 11
To give a 3D look, we just need to paint white inside the holes for the highlights.

Step 12
Another highlight is needed near those bubbles. Create selection inside the coffee using lasso tool. Paint it with white using soft brush.

Step 13
We're done with the water. Using rounded rectangle tool draw the cup's handle. Make sure you put the layer under the cup. Add Inner Shadow, Outer Glow, and Bevel and Emboss to give it a three-dimensional look.


Step 14
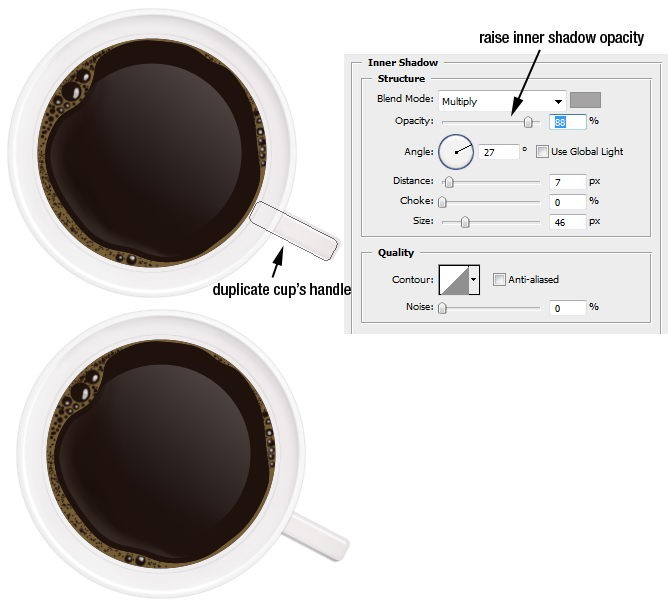
Duplicate the cup's handle. Put it under the original handle. Use same layer style but for this one raise Inner shadow to make it darker. This will add a bit perspective to the cup.
Step 15
Now, select cup handle's tip and fill it with white. This small adjustment adds more curvature to it and make it more realistic.

Step 16
It's time to add shadow. Hold shift and Ctrl+click all coffee thumbnail layer to select it. Nudge the selection by pressing up and right arrow a few times. Fill it with black, add Gaussian Blur, then lower the opacity to 50%.

Step 17
We're done creating the coffee. Let's tidy up the layers. Select all the layers and hit ctrl+G. This will automatically put every layers in a group. Name this group coffee and click eye icon to hide it. Next, we'll focus on creating the paper napkin.
Step 18 - Creating Paper Napkin
(a) Using rectangular marquee tool, create a selection for the paper. (b) Press Q to enter quick mask mode. (c) Click Filter > Pixelate > Crystallize. (d) This filter will create torn edges effect to the selection. (e) Again, hit Q to return to normal mode.


Step 19
Click Filter > Texture > Texturizer. Use Texture: Canvas with Relief: 1 then click OK.

Step 20
The paper is too clean, not so realistic. We need to make it darker and a bit dirtier. To do this, paint it using burn tool. Make sure you use low exposure and paint repeatedly to have gradual and subtle effects.

Step 21
To make it even darker add Levels (ctrl+L) and move grey arrow a bit to the right.

Step 22
Download paper texture from this page. Paste wrinkled-paper.jpg on top of our paper.

Step 23
Hit ctrl+alt+G to put the texture inside our paper. Change blend mode to Multiply and lower its opacity to 20%.

Step 24
Double click paper's layer and add Drop Shadow. No need to worry about the setting, default setting is okay.

Step 25
Take a look at what we have now! Isn't that stupid. In real life, there's no shadow like this. Surely, we need to work on it.

Step 26
From Layers panel right click layer styles list and choose Create Layer. This step will separate layer styles to its own layer and gives us full control. You might get warning dialog box, if you do just click OK.


Step 27
Activate the new shadow layer. Hit ctrl+T, right click and choose Warp. Drag the handles until you have a realistic shadow. And that's it, we're done with the paper napkin!


Step 28
Time to bring back the coffee. From the Layers panel click eye icon in front of the coffee group to reveal it.

Step 29 - Adding Coffee Stain
I want you to download coffee stain brush set from this page. Change foreground color to #6D5631 and paint one or two stains under the cup. Make sure you use brush size smaller size smaller than the cup or it will looks weird.


Step 30
You can stop here but I want to add more realism to this image. Create new layer and draw one more stain out side the paper napkin. I want to make impression as if the owner forget to put the cup on the napkin.

Step 31
Coffee stain outside the paper has to be different from those inside. Ctrl+click paper to create selection based on the paper size.

Step 32
Make sure the coffee stain layer is still active. Open Levels (ctrl+L) and move black slider to 50 to make the selected stain lighter.

Final Result
We're done with this picture. Finally, you might want to add texture for the background. I hope you learn one or two techniques from this tutorial and have good time while doing it. Click on the image below or click here to see it in full size.
